Before you can create your first Campaign, you must have created some SiteSpect components to use in that Campaign. Metrics are one of the components you must create. A Metric is a behavior that you want to affect on your website. In many cases, this behavior consists of arriving at the purchase complete page, but it could be another page, such as the request-a-demo page, or an action such as submitting a form or clicking a button. Metrics allow SiteSpect to register that a user has taken a specified action or reached a Site goal. When a user arrives at a specified Metric, SiteSpect knows which Variations they saw. These instructions show you how to create a simple Metric.
How to create a metric in the new Superfresh UI
To create a new metric:
Select Create then Metric and you will get the create metric modal. Give your metric a name, description, and tags and press Next. The description and tags are optional but will help you organize your metrics.
You will see your metric name, tags, and description on the metric detail page at the top. Next, select a metric type and method.
Metric Type
The metric type determines what data points your metric will collect when the trigger conditions are met. The options are Event, Numeric measurement, and String capture.
Event
Event metrics will record every time the trigger conditions are met. This could be page views, button clicks, form submissions, or other user actions. In your analytics reports, you will have access to the unique and total hits to the metric.
Numeric measurement
Numeric measurement metrics capture a numeric value along with the unique and total hits. The number can be extracted from the URL, page source, or request payload of the request that matches the trigger conditions. When a metric is configured as a numeric measurement, the value capture conditions are required for the metric to match.
Your analytics reports will include the captured value in addition to unique and total hits. This is a common choice for tracking order value and item quantity.
String capture
String capture metrics are similar to numeric measurements, but they capture alphanumeric string values. Use this when the strings you are capturing should remain as discrete values, and not be reported as averages or sums. For example, order ID, SKUs added to cart, and categories visited.
The unique and total hits are available in your analytics reports, and the discrete values are also included in the full data exports.
Method
The method determines how you will define when your metric should match. Numeric measurement and string capture are only available with server-side triggers. If you need to capture values from an SPA or PWA website, consider using the custom event listener method.
Trigger
The trigger method allows you to select from a variety of custom, and pre-define global trigger types, such as server-side or client-side URL path, page source, past user behaviors, and request payload content. These triggers can be combined.
Custom event listener (advanced)
This option will match when a custom event is sent to the SiteSpect EventTrack endpoint. You will include JavaScript code in a global change that sends an event name, and optional value when your action occurs. In your metric definition, you only need to specify the event name. Read more about EventTrack metrics.
Defining triggers
Triggers allow you to describe precisely when (or under what conditions) to track visitors to your site. When a visitor arrives at the location described by the Triggers, SiteSpect records that visitor's behavior. There are several different categories of Triggers.
Global Triggers
Global triggers are a reusable set of match conditions that are defined in one location and then used when building metrics, campaigns, or global changes. Updates to the definition of a global change will be reflected everywhere it is used as a trigger. Global triggers can be composed of either server-side or client-side triggers.
Server-side triggers are evaluated on the server with every network request. Use with traditional websites and multi-page applications (MPAs).
- URL
- Page Source
- Request Payload
- Parameter
- Geo Location
- Header
- Visitor Behavior
- Audience
- Page Category
Client-side triggers are evaluated in the browser. Use with single-page applications (SPAs) and progressive web applications (PWAs).
Select the type of Trigger from the drop-down. Use the information in the topics on Triggers to determine which to use and how to complete the Trigger fields.
Metrics can have multiple Triggers. To add a Trigger, click the Add trigger button within the server-side or client-side trigger section. All triggers must be satisfied for the metric to match.
The following is an example of using a server-side global trigger combined with a custom URL trigger to match only on press-release blog posts.

Defining custom event listener
When using the custom event listener option (also known as EventTrack), you only need to specify the event name that your JavaScript code is sending to our EventTrack endpoint. If you have selected the numeric measurement or string capture metric type, you only need to specify the event name in your metric, but you will need to ensure your JS code is sending the value along with the name.

Capture custom values
If you selected either numeric measurement or string capture, you will also need to define where to capture the value. You can extract these numbers from the URL, page source, or request payload of the request that matches the trigger conditions. The value capture conditions become part of the trigger requirements for the metric, so if there is no value to capture, the metric will not match.
Use a regex capture group to define which part should be included in the metric.

Save your metric
Once you have filled in the metric definitions, click Create from the save panel at the bottom of the screen. Your metric is now available to be added to campaigns!
Preview URL
The Preview URL field contains the full URL for the page where you want the preview to begin. It contains, by default, the domain of the current site. You can leave the default as is or type the full URL in the URL field, including the domain. Open the Options modal to select whether you want to also preview global changes that apply to all traffic.
Once you have saved your metric, you can easily preview your metric on a mobile device using a QR code or send a sharable preview link to stakeholders by clicking the Get links button on the right of the preview URL field.

Status
When you create a Metric, its status is Active, which means that it is available when you are creating a Campaign. To change its status, select Archive from the three dot menu at the top right of the purple header.

Settings
Default metric: When you select this option, SiteSpect adds this Metric to all new Campaigns.
Default KPI: When you select KPI, you're saying that you want this metric to be the primary conversion event that you are optimizing for within a campaign. Your site can only have one default KPI, but the KPI can be customized per campaign. Examples are visitor checkout or sign-up.
Personalization metric: When you select this option, SiteSpect allows you to use the metric as a trigger or audience in a campaign. SiteSpect will measure activity to these metrics for all users, even when the metrics are not included for reporting in any campaigns.
Each site is restricted to a finite number of event metrics or string capture metrics that can be set to personalization. The limits are configurable with a default of 10 for event metrics, and 5 for string capture metrics. Reach out to your account team if you would like to adjust your limit.
To save a metric when you are at your limit, uncheck “Use in a campaign trigger or audience to personalize the campaign”, or remove the option from another metric.
Detect Outliers: When you select Outliers, SiteSpect collects extra data that allows you to remove unwanted noise from Campaign reports. Use a Reporting Segment (expert mode) to remove outliers from a report or apply smoothing with a Calculation. A Site can have at most five Metrics that detect outliers.
Sequence: Sequence sets the evaluation order of metrics and variations by SiteSpect. Lower numbers are processed first. Metrics default to 10 and variations to 50, so metrics are counted before variations are applied. For personalization metrics, lower the sequence value from the default to ensure it's evaluated first.
Count users who trigger this metric: Used as an additional or alternative means for counting users within a campaign. Commonly used with Origin Experiments. Learn more.
Default report data points: Choose the default data points to display in your reports. You can toggle the visibility of any data point within a report.
Alerts
No data alert: Get an alert when this metric has no data in any active campaigns.
Hurting KPI alert: Get an alert when a campaign hurts this metric's performance and this metric is the KPI.
How to create a metric in the legacy UI
To create a new metric:
- Select New then Metric. The New Metric page opens.

Metric Name
Provide a name for the Metric. SiteSpect uses the Metric Name on the Metric List page as well as on reports. Metric names must be unique. This field is required.
Description
Write a Description of the Metric. Write something that reminds you about the purpose of this Metric or other helpful details. This field is optional.
Hurting KPI Alert
SiteSpect can inform you when a Campaign is hurting the Key Performance Indicator (KPI) and this Metric is the KPI. When you turn this feature on, SiteSpect allows you to set levels for notification.
- Click On to turn on the Hurting KPI Alert. It is Off by default.
- In the Raise Alert When area of the page, click the edit icon (little pencil) in the upper right corner.
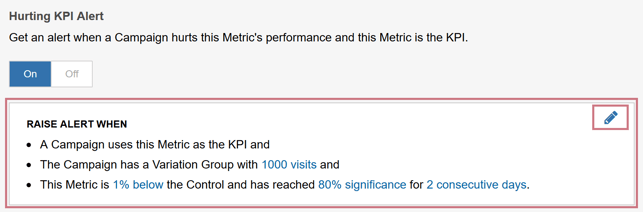
SiteSpect displays the Hurting KPI Alert dialog that lets you specify when an alert should be displayed.
- Use the visits field to determine how many visits have been exposed to the Variation Group before SiteSpect evaluates the Metric’s performance against the Control.
- In the % below the Control field, enter the percentage difference that triggers the alert.
- In the % significance field, enter the percentage significance that you want to use for the alert.
- Finally, enter the number of days to examine for the alert.
- Click Apply. When all of the conditions are met, SiteSpect displays an alert.
Tags
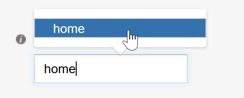
Tags organize objects into groups. For example, you may want to organize your Metrics by type such as Check Out or Product Page. You may also want to use Tags to group objects you are currently working on by creating a Tag with your name and applying the Tag to your objects. To add a Tag, start typing in the Tag field. If your Tag already exists, select it from the list; if not, click it as typed. Keep in mind that Tags cannot contain hash symbols (#), commas, or spaces. Tags are optional.
When to Measure (Triggers)
Triggers allow you to describe precisely when (or under what conditions) to track visitors to your site. When a visitor arrives at the location described by the Triggers, SiteSpect records that visitor's behavior. There are several different categories of Triggers:
- EventTrack
- Server Side Triggers
- URL
- Page Source
- Request Payload
- Parameter
- Geo Location
- Header
- Visitor Behavior
- Audience
- Page Category
- Client Side Triggers
Select the type of Trigger from the drop-down. Use the information in the topics on Triggers to determine which to use and how to complete the Trigger fields.
Metrics can have multiple Triggers. To add a Trigger, click the AND button on the right edge of the page. All Triggers must be satisfied in order to trigger the Metric.

To delete a Trigger, click the Minus button.
Capture a Custom Value
You can use a Metric to collect custom information about visits. This area is optional.

Value Type
There are two types of Custom Values as follows:
Numeric Value: Captures a Numeric Value to help you understand the effect of the test on your bottom line. Order value is a good example. Use Numeric Values when you want to use the values you collect in a calculation of some kind in which numbers represent actual amounts. Do not collect User IDs with a Numeric Value type; IDs are considered by SiteSpect to be strings and not numbers.
Custom Variable: Captures values that describe your website's content and your user's experience. Learning what terms visitors searched for is a good example. You can use Custom Variables for segmentation and reporting. Collect User IDs with a Custom Variable because IDs are really strings and not numbers.
Capture From
Capture From determines whether to capture the value from the body of the page or from the page URL.
Page Source: Looks for the value in the body of the page.
URL: Looks for the value in the URL.
Use the text field below this setting to enter the value you want to capture.
Settings
Default Metric for new Campaigns. When you select Default, SiteSpect adds this Metric to all new Campaigns.
Default KPI for new Campaigns. When you select KPI, you're saying that you want this Metric to be the ultimate conversion event that you are optimizing for within a Campaign. Examples are visitor checkout or sign-up.
Use in a Campaign Trigger or Audience to personalize the Campaign. When you select Personalization, SiteSpect allows you to use the Metric as a Trigger or an Audience in a Campaign.
Detect Outliers. When you select Outliers, SiteSpect collects extra data that allows you to remove unwanted noise from Campaign reports. Use a Reporting Segment (expert mode) to remove outliers from a report or apply smoothing with a Calculation. A Site can have at most five Metrics that detect outliers.
Preview URL
The Preview URL field contains the full URL for the page where you want the preview to begin. It contains, by default, the domain of the current Site. You can leave the default as is or type the full URL in the URL field, including the domain. Open the Advanced Settings area to see a few more Preview settings.
Metric Status Box
In the upper right corner of the Metric page, is a status box that presents some helpful information about the Metric.

Metric Status
When you create a Metric, its Status is Active, which means that it is available when you are creating a Campaign. To change its Status, select Make Inactive in the Metric Status box.
Metric Details
The Metric Status box displays the following information about the Metric:
- The date it was created.
- The date it was last edited.
- A link that brings you to an edit history of the Metric.
- An ID for the Metric, which you can use with our API.
- A number that tells you how many Campaigns use this Metric. This is an active link that takes you to a dialog that reports the names of the Campaigns this Metric is associated with.
- An active link to a statistics window that reports on several data points for this Metric.

Click the Show Advanced Settings link to open the Advanced Settings dialog for Metrics.
Saving
Click Save when you are done to save the new Metric. It is now listed on the Metric List page and is available for you to use while creating a Campaign.