The SS.EventTrack object offers several JavaScript functions to capture metrics from user interactions on your website by specifying an Event Name when calling SS.EventTrack, you can track actions ranging from visitors clicking a link that takes them away from your site to engaging with form buttons and navigating menus through mouse-overs.
Essential Functions within SS.EventTrack
rp()
Short for "response point," this function takes an event name as the first argument and additional data as the second argument, sending this information to the server for tracking. It can be used for any user interaction you wish to track, such as clicking a link or a button.
rpAsync()
This method is designed for asynchronous event reporting. It's used when you want to report an event without blocking the user's interaction with the page. This is particularly useful for interactions that do not lead to page navigation or where you want to ensure the user experience remains fluid.
rpSync()
In contrast to rpAsync, this method is for synchronous event reporting. It ensures that the event is logged before the following actions on the page continue, which might be necessary to record critical events before the page is navigated away from or refreshed.
Through examples and explanations, we'll dive into setting up JavaScript to trigger these metric functions, focusing on selecting the correct elements and understanding the logic behind these interactions.
Multi-Page Applications (MPAs)
Tracking a CTA Button Click
Code Example:
document.querySelector('#cta-button').addEventListener('click', function() {

  console.log('CTA button clicked');

  SS.EventTrack.rp('cta-button-click');

});
Explanation:
In this example, document.querySelector('#cta-button') is used to select the CTA button. The #cta-button is an ID selector chosen because it's unique to the CTA button on the page, ensuring that the click event listener is explicitly added to the element we're interested in tracking. When the CTA button is clicked, the function inside addEventListener is executed, logging the click or sending data to SiteSpect for metric tracking. Using an ID selector is reliable for targeting specific elements, as IDs are supposed to be unique within a page.
When using the provided snippet for tracking a CTA button click, ensuring that the JavaScript code executes after the entire page has loaded becomes crucial. Wrapping your event listeners within a DOMContentLoaded event listener ensures that your JavaScript code runs after the HTML document has been fully loaded and parsed, thus preventing errors related to attempting to select elements that haven't been loaded into the DOM yet.
document.addEventListener('DOMContentLoaded', () => {
  document.querySelector('#cta-button').addEventListener('click', function() {

    console.log('CTA button clicked');

    SS.EventTrack.rp('cta-button-click');

  });
});
Tracking a Banner Image Click
Code Example:
document.querySelector('.banner-image').addEventListener('click', function() {

  console.log('Banner image clicked');

  SS.EventTrack.rp('banner-image-click');

});
Explanation
This code snippet employs document.querySelector('.banner-image') to select the banner image. Here, .banner-image is a class selector, which is useful when you expect to track clicks on items that may share a common purpose or design but have multiple instances across the site. While classes are not unique like IDs, they allow for a broader targeting strategy. Upon clicking the banner image, the function provided to addEventListener runs, signaling a click event. It's a straightforward way to measure engagement with visual elements like banners. Class selectors can be particularly useful when applying the same tracking logic to multiple elements that share the same class.
Single-Page Applications (SPAs)
For Single-Page Applications (SPAs), where content is dynamically loaded, and user interactions don't always lead to a full-page reload, leveraging event delegation is a strategic approach. Event delegation allows you to attach a single event listener to a parent element (in this case, the document object) to manage events that bubble up from child elements. This method is particularly effective in SPAs due to their dynamic nature, ensuring that event listeners work for elements added to the DOM after the initial page load.
Below is an example demonstrating how to track clicks on a CTA button and a banner image within the same event listener.
Code Example:
document.addEventListener('click', function(event) {

  if (event.target.closest('#cta-button')) {

    console.log('CTA button clicked');

    SS.EventTrack.rp('cta-button-click');

  }

  if (event.target.closest('.banner-image')) {

    console.log('Banner image clicked');

    SS.EventTrack.rp('banner-image-click');

  }

});
Explanation:
This code attaches a single-click event listener to the entire document. This listener waits for any click event that bubbles up to the document level, a particularly effective method for SPAs where the content might be updated dynamically.
- For the CTA Button: The first if statement checks if the click event's target or its ancestor matches the selector #cta-button. If true, it indicates a click on the CTA button. The code block inside this if statement logs the click and sends a tracking event to SiteSpect with SS.EventTrack.rp('cta-button-click');.
- For the Banner Image: The second if statement performs a similar check for clicks related to the .banner-image class. If the event's target or an ancestor matches .banner-image, it logs the banner image click and sends a tracking event with SS.EventTrack.rp('banner-image-click');.
Critical Takeaways for Adding Multiple Interactions:
- Use event. target.closest(selector): This method is invaluable for identifying whether the clicked element matches the specified selector or is a descendant of an element that does. It's perfect for handling clicks on elements that might not be directly accessible (e.g., nested elements within a button).
- Efficiency Through Delegation: You can efficiently manage multiple interactions by utilizing a single event listener at the document level. This approach eliminates the need to attach individual listeners to each dynamic element, improving performance and simplifying code maintenance.
- Flexibility and Scalability: This pattern is highly flexible and scalable. You can add more if statements inside the single document level click event listener to track additional interactions, checking for clicks on different elements.
Global Deployment
To deploy this JavaScript globally, you can include it in a global variation within your site's management platform. This method ensures the script is loaded and executed across all applicable pages, allowing consistent tracking without additional manual setup per page.
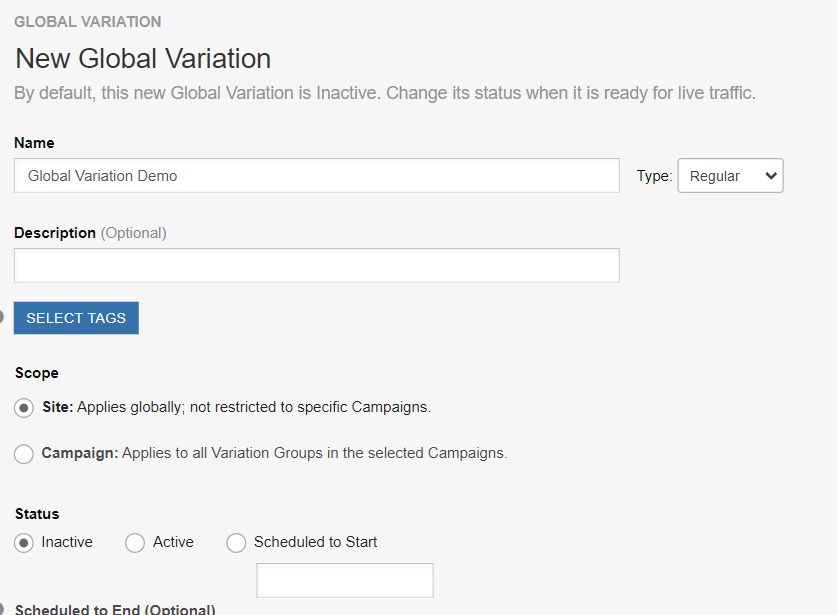
Global Variations
Global Variations work much like Campaign Variations. Setting up your commonly used Event Track metrics as a Global Variation is recommended.
When setting up a Global Variation for Event Track metrics, give the GV a descriptive name, and include a description of what it tracks. Select your scope. Leave the Status as Inactive until you Preview and QA your code to confirm it doesn’t impact live traffic.
When injecting Javascript into a page, it is recommended that you use defensive triggers to verify that the code is only being injected where it should be.
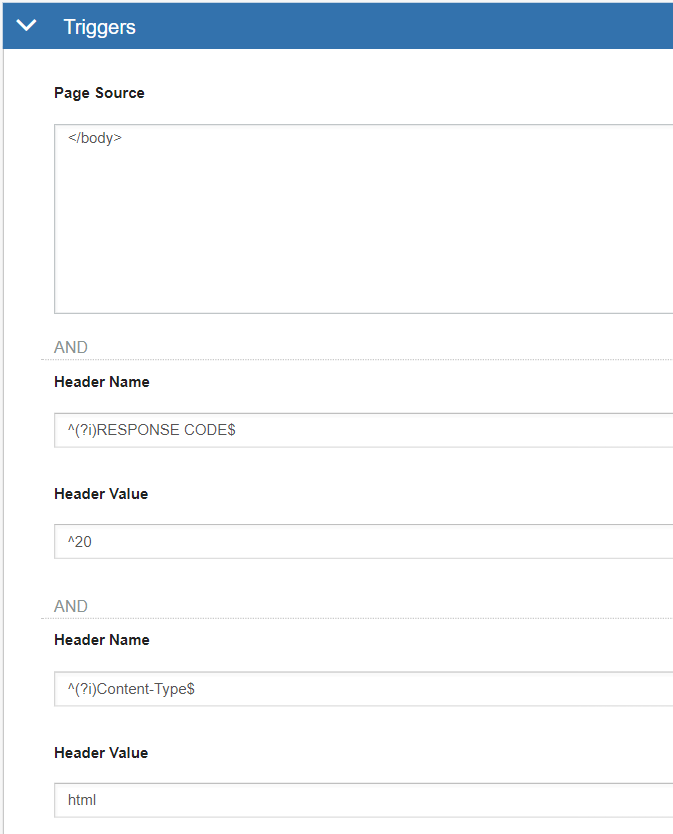
Those triggers will verify that we are only injecting the HTML tags and script when it is a properly loaded html page with a </body> tag.
Then it is a simple find/replace to inject your code.
Additional Metric Capabilities - Capturing Values
You can capture custom variables along with the event name by passing them as additional parameters in the reporting functions (i.e., rp(), rpSync(), etc.). This functionality enables the capture of specific values associated with the events, such as user IDs, timestamps, or other pertinent data.
Send/Capture a Numeric Value
Below is an example of how to pass a “Time of Day” metric. You pass the value in the same function to capture a numeric value.
document.addEventListener('DOMContentLoaded', function() {

  var now = new Date();

  var hours = now.getHours();

  var minutes = now.getMinutes();

  var seconds = now.getSeconds();

  var milliseconds = now.getMilliseconds();

  var timeString = `${hours}:${minutes}:${seconds}.${Math.floor(milliseconds / 100)}`;

  SS.EventTrack.rp("PageLoaded_wTOD", timeString);

});
In this example, you would set up your Metric with these options to capture that value for reporting. Set the Event Name as the Parameter value, and ensure the “Capture value for this EventTrack” is enabled. The “Capture numeric measurement” option will be selected by default.

Send/Capture a Custom Value
This method is used for non-numeric data. This information will not be available in the Performance Matrix directly but can be accessed in report logs that can be downloaded. The value is passed in the function as shown below:
document.addEventListener('DOMContentLoaded', function() {

SS.EventTrack.rp("PageLoaded_wURL", document.location.pathname);

});
Ensure the “Capture custom variable” radio button is selected when capturing values from a Custom Value.

Send/Capture JSON (or any other format of text data)
You can also pass values in the function. The setup of the metric, however, differs:
Here is an example of sending a banner click X, Y, and CTA Text
document.addEventListener('DOMContentLoaded', function() {

  document.querySelector('.banner').addEventListener('click', function(event) {

    var rect = event.target.getBoundingClientRect();

    var clickX = event.clientX - rect.left;

    var clickY = event.clientY - rect.top;

    var ctaText = event.target.innerText || event.target.querySelector('*').innerText;

    var eventData = {

      clickX: clickX.toFixed(1),

      clickY: clickY.toFixed(1),

      ctaText: ctaText

    };

    SS.EventTrack.rp("BannerClickDetails", JSON.stringify(eventData));

  });

});
When creating this metric, first ensure the “Capture custom variable” radio button is selected. Then, proceed to “Edit EventTrack Triggers” to open additional configuration options for capturing the value after it is triggered.
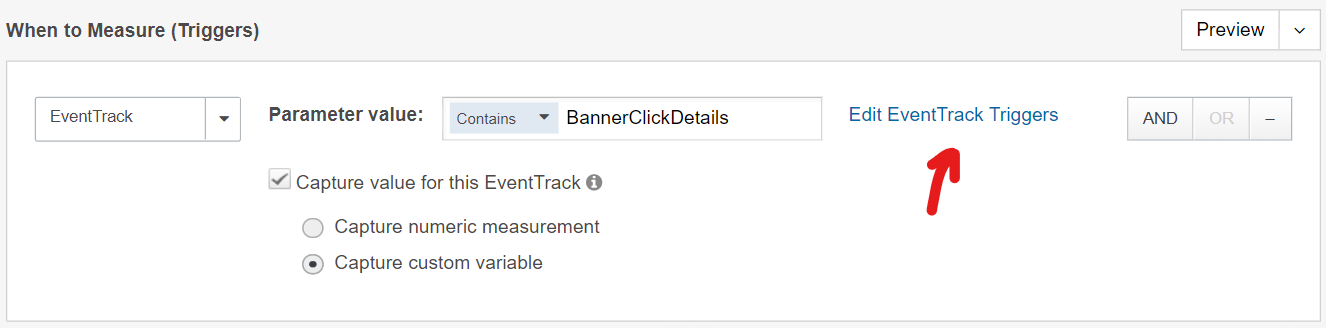
This will open additional options for us to grab just a single value.
First, you will see that area change to look like this,
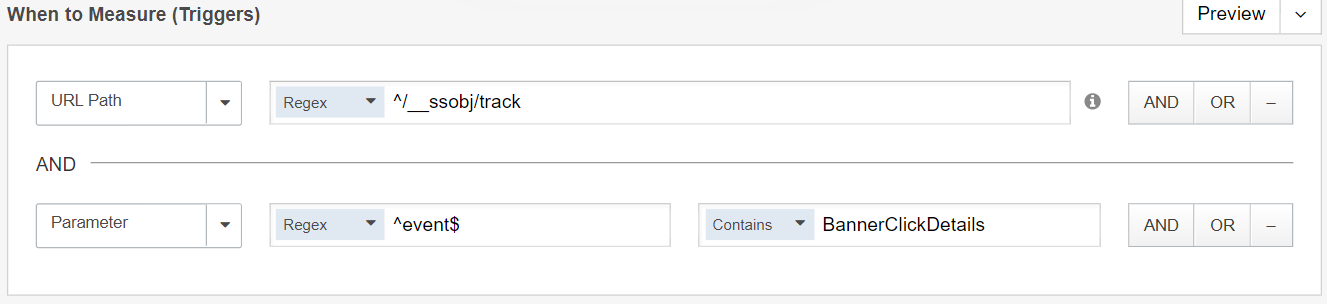
You will not need to adjust this area for standard Event Track metrics. It allows for Event Track functionality without using the SS.EventTrack library of functions. You can create your own Path and Query Parameters.
Below is a new area with an additional configuration for capturing the value after it is triggered.

In the above example, the URL request for the Event track would look something like this.
/__ssobj/track?event=BannerClickDetails&value=%7B%22clickX%22%3A%22512.0%22%2C%22clickY%22%3A%22117.8%22%2C%22ctaText%22%3A%22%C2%A0%22%7D&x=1715407223318-1
The value of the Event Track would be
{"clickX":"250.0","clickY":"50.0","ctaText":"ON SALE!"}
In the “Capture From/URL” textarea, you can use RegEx and a capture group to pick out exactly the data you want to capture. For instance:
"clickX":"(\d+\.\d+)", "clickY":"(\d+\.\d+)", "ctaText":"([^"]+)"
In this example, you could set up three metrics and call the function only once to send all the necessary information.
Understanding the DOM and Selectors
The DOM is a programming interface for web documents. It represents the page so that programs can change the document structure, style, and content. The DOM also represents the document as nodes and objects so that programming languages can interact with the page.
A selector targets specific elements within the DOM to apply styles (in CSS) or manipulate them (in JavaScript). Understanding where an element resides within the DOM is essential for accurately selecting it for interactions, styling, or manipulation.
Types of Selectors
- ID Selector (#id):
- Uniquely identifies a single element within the page.
- Example: #cta-button targets an element with the ID of cta-button.
- Class Selector (.class):
- Targets one or more elements that share the same class attribute.
- Example: .banner-image targets all elements with the class of banner-image.
- Tag Selector (tagname):
- Targets all elements of the specified tag type.
- Example: div would target all <div> elements within the page.
- Attribute Selector ([attribute="value"]):
- Targets elements based on the presence of a specified attribute or attribute value.
- Example: [type="submit"] targets all elements with a type attribute value of "submit".
- Attribute Starts With Selector ([attribute^="value"]):
- This selector targets elements whose specified attribute value begins with a particular string.
- Example: [href^="https"] targets all elements whose href attribute value starts with "https", which could be used to select secure links (HTTPS).
- Attribute Ends With Selector ([attribute$="value"]):
- This selector targets elements whose specified attribute value ends with a particular string.
- Example: [src$=".jpg"] targets all elements whose src attribute value ends with ".jpg", helpful in selecting images with a specific file format.
- Attribute Contains Selector ([attribute*="value"]):
- Targets elements whose specified attribute value contains a particular substring anywhere within the value.
- Example: [class*="text-"] targets all elements whose class attribute contains the substring "text-". This could be useful for targeting elements with class names that include a specific prefix or identifier.
- Attribute Starts With Selector ([attribute^="value"]):
Descendant Selector (ancestor-descendant):- Targets elements that are descendants of a specified ancestor.
- Example: #navigation .link targets all elements with the class link inside an element with the ID navigation.
Useful Pseudo-classes for your Selectors
Pseudo-classes let you select elements based on their information in the DOM tree.
- :first-child: Selects an element that is the first child of its parent.
- :last-child: Selects an element that is the last child of its parent.
- :nth-child(n): Selects an element that is the nth child of its parent according to a formula or a specific number. It's incredibly useful for styling elements in lists or grids in a pattern (e.g., every even or odd item).
- :not()
- Description: The :not() pseudo-class represents elements that do not match a list of selectors. It's incredibly useful for applying styles to elements that exclude specific characteristics.
- Example: div:not(.class) targets all <div> elements that do not have a class of .class.
- :is()
- Description: The :is() pseudo-class allows for a more concise and readable style by grouping multiple selectors. Any element matching at least one of the selectors within the :is() function is selected.
- Example: :is(.class1, .class2) targets elements with either .class1 or .class2. This is especially handy for simplifying complex or repetitive selectors.
- :has()
- Description: The :has() pseudo-class selects an element if it contains at least one element that matches the selectors listed inside the :has() parentheses. It’s particularly powerful for structural queries, although it's primarily used in JavaScript’s document.querySelector() and document.querySelectorAll() due to its limited support in CSS at the time of writing.
- Example: div:has(> .class) targets <div> elements that have a direct child with the class .class.
These advanced selectors enhance the specificity and flexibility of your CSS and JavaScript, allowing for more targeted styles and interactions based on complex conditions. While :not() and :is() offer great ways to streamline your selectors, :has() opens up possibilities for selecting elements based on their descendants.
Combining Selectors
Combinators can be used with other selector types, including class, ID, attribute selectors, pseudo-classes, and pseudo-elements, for precise targeting. This allows for many possibilities, enabling developers to address complex styling and interaction scenarios with specificity and efficiency.
- Child Combinator (>)
- Description: The > combinator selects elements that are direct children of a specific parent.
- Example: div > p targets all <p> elements that are direct children of a <div>.
- Adjacent Sibling Combinator (+)
- Description: The + combinator targets an element immediately preceding a specific element at the same level in the hierarchy.
- Example: h2 + p targets the first <p> element immediately following any <h2>, provided they share the same parent.
Example:
document.querySelector("div.class[attr=value] > p:first-child + span");
This example demonstrates combining several selectors and combinators to select a specific <span> element that is the immediately following sibling of the first <p> child of a <div> with a specific class and attribute value.
Practical Examples
- Selecting a Nested Button: Suppose you have a modal with an ID of #user-modal and inside it, a button labeled 'Close'. If multiple buttons exist on the page, but you specifically want to target the 'Close' button within the modal, you could use a descendant selector: #user-modal button.close.
- Targeting a Unique Article: If articles on a blog page are categorized with classes but also have unique IDs, and you want to apply JavaScript logic to one specific article, you would use the ID selector, e.g., #article-unique-id.
Using Developer Tools to Find and Test Selectors
Browser development tools are invaluable when developing or debugging web pages. They offer a wide array of functionalities, from inspecting the current state of the DOM to executing JavaScript code in real-time. Here's a concise guide on using these tools to find selectors and utilize the Console tab to test those selectors.
Finding Selectors
- Open Developer Tools: Right-click on the webpage and select "Inspect" or use the keyboard shortcut (Ctrl+Shift+I on Windows/Linux, Cmd+Opt+I on macOS) to open the developer tools.
- Use the Inspector: Navigate to the "Elements" tab. Here, you can hover over or click on parts of the webpage to see the corresponding HTML. This view is incredibly helpful for finding the exact selectors you need, such as ID, class, or other attributes.
- Copy CSS Selector: Right-click on the element of interest in the "Elements" tab and select "Copy" > "Copy selector." This copies a CSS selector path into your clipboard, which you can paste into your JavaScript code, text editor, etc.
Important Caveat on Dynamically Created Classes
When using browser development tools to copy CSS selectors, exercise caution with classes that appear to be dynamically generated. These are often easily identifiable by their complex, nonsensical, or hashed names (e.g., .class-x9aB1cD). These classes are typically generated by web frameworks (like React, Angular, and Vue) or CSS modules for various reasons, including scoping styles and avoiding naming conflicts.
Why to Avoid Using Dynamically Generated Classes:
- Instability: Dynamically generated class names can change whenever the website's code is rebuilt or updated, making your selectors brittle and likely to break over time.
- Lack of Readability: Class names usually need more semantic meaning, making your code easier to understand and maintain.
What to Look For:
- Patterns in Naming: Dynamically generated classes often follow a pattern that includes hashes or alphanumeric sequences. Identifying these patterns can help you recognize them.
- Consistency Across Elements: If similar elements across different instances of the application or different pages use vastly different class names, those are likely dynamically generated.
Alternative Ways to Select Elements:
- Static Classes: Look for class names that are not subject to change. These are typically more semantic and manually assigned in the HTML or template files.
- IDs and Attributes: Use unique ID attributes where available, or look for custom data attributes (e.g., data-button-3) often explicitly added for testing or selecting elements.
- Nested Selectors: Construct selectors based on the stable structure of the HTML document. For example, selecting an element based on its relationship to a parent or sibling that has a reliable identifier.
- Text Content: CSS selectors cannot select based on text content. JavaScript offers a possible workaround. In the following example, I am checking that the text “On Sale” is in the banner element that was clicked.
document.addEventListener('click', function(event) {

  if (event.target.closest('.banner') && event.target.innerHTML.includes("On Sale")) {

    SS.EventTrack.rp('cta-sale-click');

  }

});
Converting a dynamic class selector to an element name-based selector
The following script converts a selector that uses dynamic classes into a selector using the tag selector. You can run this all from the Console in the Web Developer Tools.
function getDomPath(el) {

    var stack = [];

    while (el.parentNode !== null) {

        let elSelector = el.nodeName.toLowerCase();

        if (el.id) {

            elSelector += '#' + el.id;

            stack.unshift(elSelector);

            break;

        } else {

            const childIndex = Array.from(el.parentNode.children).indexOf(el) + 1;

            elSelector += `:nth-child(${childIndex})`;

        }

        stack.unshift(elSelector);

        el = el.parentNode;

    }

    return stack.join(' > ');

}
Example Usage:
var el = document.querySelector('div.css-175oi2r.r-1awozwy.r-6koalj.r-18u37iz');

var path = getDomPath(el);

console.log(path);
Output:
div#react-app > div:nth-child(1) > div:nth-child(1) > div:nth-child(1) > div:nth-child(1) > div:nth-child(1) > div:nth-child(1) > div:nth-child(1) > div:nth-child(1) > div:nth-child(2) > div:nth-child(2) > div:nth-child(1) > div:nth-child(1) > div:nth-child(1) > div:nth-child(2) > div:nth-child(1) > div:nth-child(1) > div:nth-child(1) > div:nth-child(1) > div:nth-child(1)
This method prioritizes stability and specificity in the face of frequently changing class names, common in modern web development environments that utilize frameworks and libraries for UI components. However, it's crucial to acknowledge that while this approach mitigates issues related to dynamic class names, it introduces a dependency on the structure of the document remaining constant. Web pages and applications are often updated, and even minor adjustments in the DOM structure could render such selectors outdated.
Testing Selectors in the Console Tab
- Switch to the Console Tab: Find and click on the "Console" tab inside the developer tools. This tab allows you to write, test, and execute JavaScript in the current page's context.
- Use document.querySelector(): Type document.querySelector('yourSelectorHere') into the console, replacing yourSelectorHere with the CSS selector you found earlier. Press Enter to run the command. If the selector is correct, it will return the element that matches the selector. If it returns null, no element matches the selector, indicating you may need to revise it.
- Experiment with Selectors: The Console tab is an interactive JavaScript environment so that you can modify your selectors on the fly. Try different variations to see how they affect the returned result. This experimentation can be particularly useful for refining selectors to ensure they target the desired elements accurately.
- Testing Multiple Elements: If you suspect your selector should match multiple elements, use document.querySelectorAll('yourSelectorHere'). This function returns a NodeList of all elements that match the selector.
Practical Tips
- Dynamic Content: Remember that some content might be loaded dynamically with JavaScript. If you can't find an element you see on the page, try interacting with the page or waiting a moment before inspecting the element again.
- Unique Selectors: While ID selectors are unique, classes and attributes might match multiple elements. Use specific paths or combine selectors for precision.
- Debugging JavaScript: The Console tab is also great for running snippets of JavaScript code to debug or test small pieces of functionality without editing your source files.
Best Practices
1. Choosing the Right Selector
- Specificity is Key: Use the most specific selector to target the element you intend to track accurately. IDs (#id) are perfect for singular, unique elements, while classes (.class) are better suited for groups of elements sharing the same characteristic.
- CSS Selectors for Dynamically Generated Content: For elements added to the page dynamically (e.g., through JavaScript), consider using more complex CSS selectors or MutationObservers to attach event listeners as soon as these elements become available in the DOM.
2. Efficient Use of Event Listeners
- Avoid Excessive Listeners: Attaching an event listener to every element can lead to performance issues, especially on pages with many interactive elements.
- Event Delegation: Leverage event delegation by attaching a single event listener to a parent element. This listener can then manage events triggered by its child elements, distinguishing between them using the event.target property. This is particularly efficient for handling events on elements that share the same parent.
3. Consistent and Meaningful Naming Conventions
- Semantic Naming: Choose IDs and class names that describe the element’s role or content (e.g., #submit-button, .product-image). This makes your code more readable and maintainable.
4. Performance Considerations
- Throttling and Debouncing: For events that can fire frequently (e.g., scroll, resize), implement throttling or debouncing to limit the number of times your event handlers are called. This can prevent performance degradation, especially in resource-intensive operations.
// Throttle example: Limit the function execution to once every 100ms

function throttle(func, limit) {

  let inThrottle;

  return function() {

    const args = arguments;

    const context = this;

    if (!inThrottle) {

      func.apply(context, args);

      inThrottle = true;

      setTimeout(() => inThrottle = false, limit);

    }

  }

}

window.addEventListener('resize', throttle(function() {

  console.log('Resize event triggered');

}, 100));

// Debounce example: Only execute the function after 250ms have passed without it being called

function debounce(func, delay) {

  let inDebounce;

  return function() {

    const context = this;

    const args = arguments;

    clearTimeout(inDebounce);

    inDebounce = setTimeout(() => func.apply(context, args), delay);

  }

}

window.addEventListener('scroll', debounce(function() {

  console.log('Scroll event triggered');

}, 250));
5. Testing and Validation
- Use Developer Tools: Familiarize yourself with the developer tools available in modern browsers. These tools can help debug event listeners, inspect element selectors, and monitor performance.
- Cross-Browser Testing: Test your event tracking implementation across different browsers and devices to ensure consistent behavior and performance.