Campaign - General Section
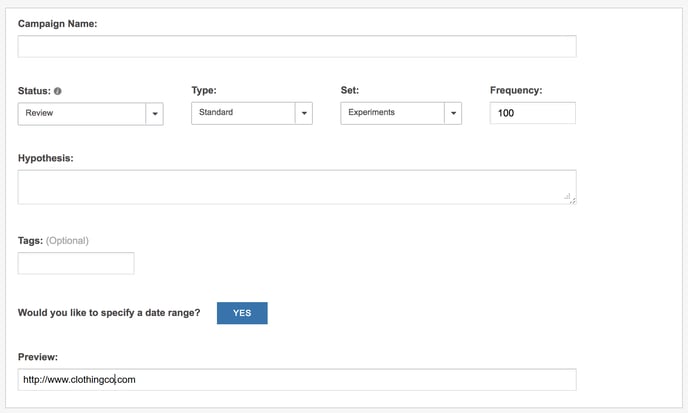
Use the General section of the Campaign page to specify key components of your Campaign.

| Field | Description |
|---|---|
| Campaign Name | Use this field to name the Campaign. The name you use here will be used on the Campaign List. Some users like to use the date in the name of the Campaign so that they know at a glance when it was created. Others name Campaigns based on a them, such as a holiday or seasonal promotion. The most important point to remember about naming a Campaign is only that you give it a name that means something to you and something you'll remember. |
| Campaign Status | The Status of a Campaign tells you what's happening with it at this particular moment in time. Campaigns are automatically placed in Review mode upon creation. During Review, a member of your team can QA the Campaign before making it live. Once QAed, a team member can set it to run by changing its Status to Active or let it begin running according to its Start Time. In some work flows, the Campaign Administrator is responsible for setting a Campaign to Ready, which queues it up to go live later. From this point on, all visitors with non-administrator privilege levels, including Campaign Builders no longer have privileges to edit the Campaign. To learn more, see Campaign Status - Campaign Builder. |
| Campaign Type | There are several Types of Campaigns available in SiteSpect. Typically, you assign a Campaign Type while defining the Campaign. The Campaign Type determines how you plan to introduce changes in your website's pages. To learn more, see Campaign Types. |
| Campaign Set | A Campaign Set is a collection of Campaigns that shares properties that determine how users are assigned to Campaigns. Campaign Sets are sometimes referred to as Sets. To learn more, see Campaign Sets. |
| Campaign Frequency | By default, SiteSpect evenly distributes visitor assignments across all active Campaigns. If you are running multiple Campaigns, you may want to adjust how visitors are assigned to each Campaign. For example, if you are running a Campaign in conjunction with a promotion that is scheduled to expire in two weeks, you may want to assign more visitors to that Campaign in favor of other Campaigns that are not time-sensitive. SiteSpect’s Frequency feature allows you to adjust the amount of traffic available to each Campaign, assuming visitors fit the criteria specified by any of the defined Audiences. More specifically, it allows you to control the individual frequency that an eligible visitor is assigned to a Campaign. Frequency does not specify a percentage of traffic to be assigned to a specific Campaign; it specifies only the probability, between 0 and 100, that an eligible visitor is assigned to a Campaign. To learn more, see Campaign Frequency. |
| Hypothesis | The Campaign Hypothesis is a brief statement that describes what you believe this Campaign accomplishes. This describes the results you expect when you run this test. |
| Tags | Tags help you organize your Campaigns. You can define and assign new Tags or select from a list of preexisting ones. You can assign as many Tags to a Campaign as you like. To learn more, see Using Tags. |
| Date Range | You can start a Campaign in the present and let it run indefinitely or specify begin and end dates. To learn more, see Specifying a Date Range. |
| Preview | The Campaign Builder provides a Preview feature for many Campaign components. When you click Preview, SiteSpect displays the URL listed in the Preview field and overlays a panel that allows you to see the effects of the components that are triggered before actually running a Campaign. After previewing, you can modify the components you have created and preview them again until you have fine-tuned the Campaign to your requirements. This simplifies the QA process and allows you to easily troubleshoot before you launch the Campaign. To learn more, see Previewing Campaign Pages. |