The first step in Sample Size Analysis and using Sequential Testing is to calculate the expected traffic to your experiment and the baseline conversion rate for your KPI. You can source this information in one of two ways:
- Your web analytics**
- SiteSpect baseline campaign (aim 7 days runtime)
** when sourcing this data from your web analytics you must consider the impact of SiteSpect campaign settings on the traffic volumes and KPI conversion rate. Campaign triggers, audience criteria, assignment frequency and overlay settings will need to align with the data you obtain to ensure the calculation and estimates are accurate. Using a SiteSpect baseline campaign to provide the data inputs can be a simpler approach since any triggers, KPI and audiences that are created will be reused in the experiment once the change has been built and is ready to go live.
The recommended approach to enable Sequential Testing including a SiteSpect baseline campaign is as follows:
The recommended approach to enable Sequential Testing including a SiteSpect baseline campaign is as follows:
1. Create a baseline campaign in SiteSpect with the triggers, audiences and KPI you require for your experiment but leave what to change blank.
2. You can switch [OFF] the original/control since we only need data for a single Variation Group to provide the Sequential Testing inputs.
3. Ensure you include the word "Baseline (Copy)" at the end of the campaign name for easy identification.
4. Run this baseline campaign until you are ready to start the actual experiment.
5. When you are ready to start the actual experiment, COPY this baseline campaign, and rename it by removing the words "Baseline (Copy)" from the name.
6. Go to the variation section and add the changes.
7. With the campaign still in review, click SAVE.
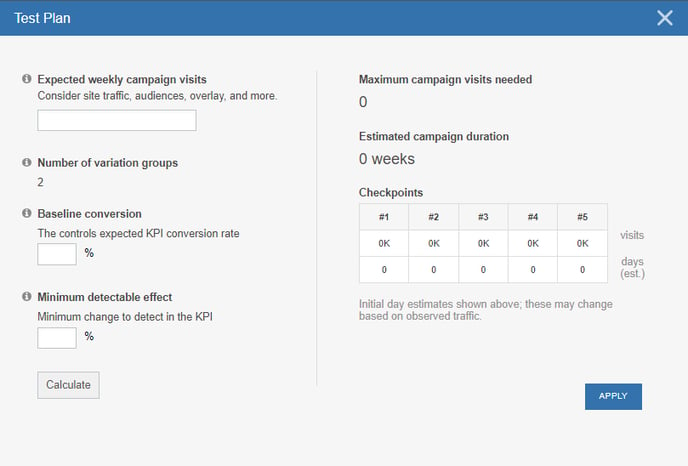
8. Go to the top right corner on your campaign page and select the three dots menu. Choose 'Test Plan.' You will see the below modal:
9. Go back to the baseline campaign, and open the analytics.
10. Filter the campaign using start and end time to determine the weekly visits. If the campaign has been live less than 1 week you multiply the daily traffic by 7 to get the estimated weekly campaign visits.
11. Place this figure into the "Expected weekly campaign visits" field in your test plan.
12. Now look at the KPI of the test in the baseline. Using the "uniques" representation of that metric, grab the % conversion rate and put that number into the Baseline conversion rate box.
13. Finally, choose your desired Minimum Detectable Effect. Remember that for every 1/2 smaller size in the pursued effect, the fixed-horizon run-time of the experiment is multiplied by approximately 4. For example, if you were to pursue an effect size of 4% and the estimated fixed horizon sample requirement was 20k visits, pursuing an effect size of 2% would require approximately 80k samples. These are just notional figures but the proportionality tends to hold.
14. Click "Apply" in the bottom right corner of the Test Plan.
15. Note the checkpoints that are generated, and the estimated duration of the experiment.
16. Remember to turn your Control back on if this was switched [OFF] for the baseline campaign.
17. Set the campaign to RUNNING and click SAVE.
And that's it!
You will have successfully launched a Sequential Test, and can next anticipate getting emails as the checkpoints are reached. Remember that this takes nothing away from the ability to run the fixed-horizon experiment if you so choose, this just provides you with additional insight and the possibility of an early conclusion.