If you are interested in GA4, Integrating SiteSpect with GA4 using GTM
SiteSpect integrates with many different analytics solutions that allow you to make sense of the data you collect with your Campaigns. SiteSpect’s Web Analytics Tag Transformation and Segmentation (WATTS) feature allows you to dynamically insert information about website visitors into tracking tags used by all major web analytics programs. The tracking includes information about various SiteSpect elements including Visits, Campaigns, viewed Variations, and more.
Key features of our integration include:
- No performance penalty
- No additional server calls
- Highly reliable results
- Forty configurable macros
- Extremely flexible configuration
The steps described here tell you how to integrate SiteSpect with Google Analytics. These instructions are intended for a user who has some experience with HTML and JavaScript and who has sufficient permissions to implement code changes on your website.
High-Level Integration Steps
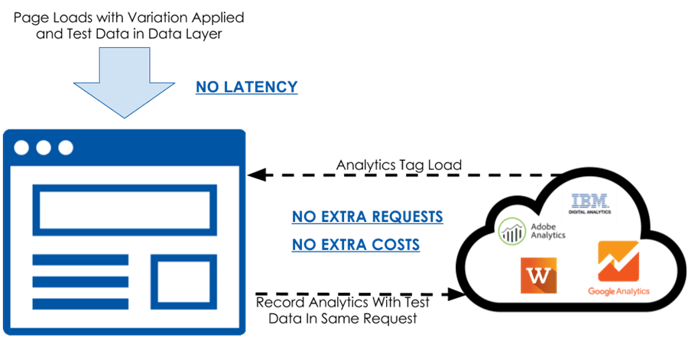
Google Analytics tracks and reports on traffic to your website. It is implemented by adding a JavaScript snippet to the HTML page. The snippet is executed in the browser and can read information from the page.
SiteSpect exists in the flow of traffic and can put essential data on the page before the Google Analytics tag is executed. As a result, SiteSpect can dynamically insert various information about the visit and visitor, such as Campaign Assignment or viewed Variations, directly into the Google Analytics tracking tag. SiteSpect WATTS functionality modifies the original HTML so you can modify existing tags and insert new ones. Once integrated, you can view, segment, and analyze SiteSpect Campaign data with Google Analytics.
To integrate SiteSpect and Google Analytics, you’ll need to take these steps. Each of these is described in more detail in later sections of this document:
- Set up Google Analytics
- Set up a SiteSpect WATTS Site Variation
- Validate the Integration
- Set up Google Analytics Dashboards with SiteSpect Data
- Set up Google Tag Manager
- Additional Capabilities
Setting up Google Analytics
Refer to Google’s documentation on how to add the Google Analytics tag to the page. Once you have implemented the JavaScript tracking snippet, you can locate it near the top of the <head> tag of your HTML page. Take a look at the HTML pages of your website and ensure that the Google Analytics tag is in the page source .
To capture SiteSpect data in Google Analytics, create a Custom Dimension:
- Navigate to the Administration Area by clicking the gray gear icon at the bottom of the left navigation menu.
-
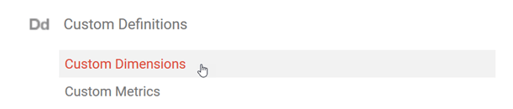
In the Property Column, select Custom Definitions and then Custom Dimensions.
-
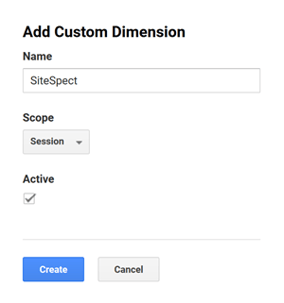
Create a Custom Dimension named SiteSpect and select Session from the Scope drop-down. Select the Active check box and click Create.
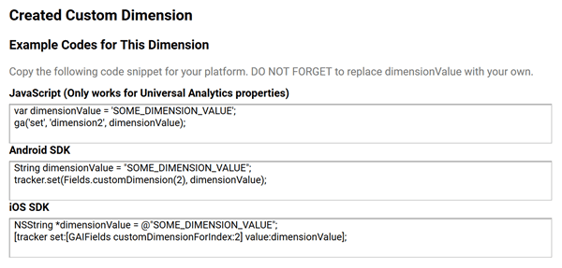
After you click Create, Google Analytics displays the following dialog.
Setting up a SiteSpect WATTS Site Variation
SiteSpect’s powerful search and replace engine transforms HTML in the flow of traffic. To send SiteSpect data to Google Analytics, set up a Site Variation using SiteSpect’s WATTS macros. Site Variations allow you to make site-wide changes independent of SiteSpect Campaigns. WATTS macros are dynamic variables or data points that are filled when the Variation is applied.
To start the integration, configure SiteSpect to pass the Campaign ID and Variation ID to Google Analytics. To do this, create a SiteSpect Site Variation with our default code snippet.
-
Select New, Global Variation.
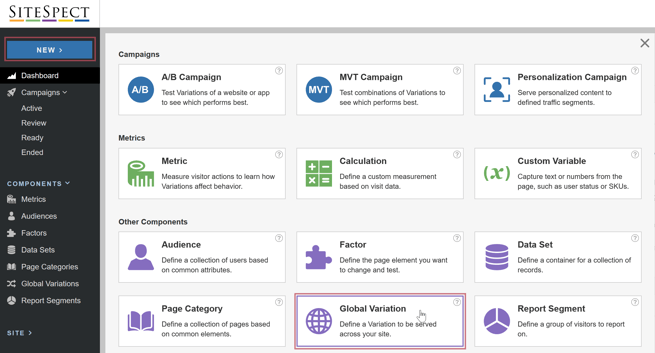
-
Name the Global Variation Google Analytics Integration. Ensure that Site is selected in the Scope field.
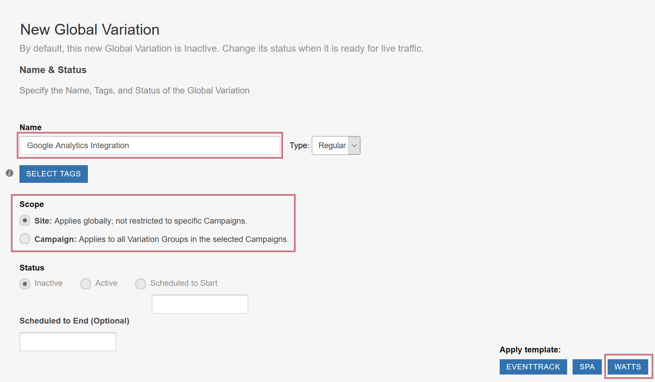
-
Click the WATTS button on the right side of the page. This prefills the Site Variation with some key WATTS macros.
To see the code that the WATTS button just inserted, expand the Triggers area of the page by clicking the right arrow next to Triggers and the right arrow next to Search & Replace.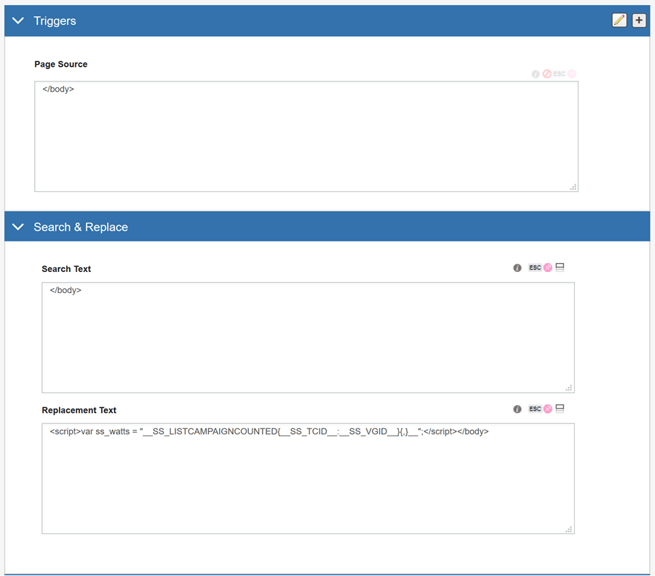
It has added a Page Source Trigger that matches on the </body> tag. This means that the Site Variation is applied only when the page has a </body> tag. This is important because we want to make these changes only on HTML pages and not for other content.
In addition, it has specified that SiteSpect should search for the </body> tag and replace it with the WATTS JavaScript code you see above, right before the closing </body> tag. The WATTS macro used here __SS_LISTCAMPAIGNCOUNTED iterates through assigned and counted Campaigns, dynamically injecting actual values for the visitor, and stores this SiteSpect data in a JavaScript variable called ss_watts.
To make this WATTS Site Variation specific to Google Analytics, modify the Replacement Text and pass the ss_watts variable as a Google Analytics dimension:
-
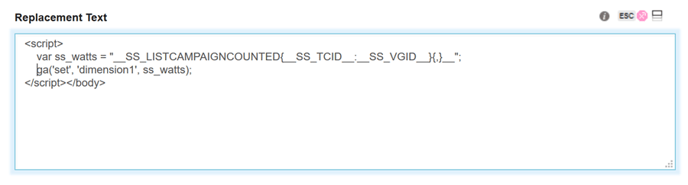
In the Search & Replace area of the page, edit the Replacement Text by entering the following immediately before </script>:
ga('set', 'dimension1', ss_watts)
Note: This line of code must appear after the variable "ga" is defined and before ga('send', 'pageview', location.pathname); is called.
When you are done editing the Replacement Text field, it looks like the following:
The following is the entire code snippet, which you can copy and paste:
<script>
  var ss_watts = "__SS_LISTCAMPAIGNCOUNTED{__SS_TCID__:__SS_VGID__}{,}__";
  ga('set', 'dimension1', ss_watts);
</script></body>
- In the Status field at the top of the Global Variation page, select Active.
- Click Save at the bottom of the page.
You are setting a Google Analytics dimension with SiteSpect data stored in the ss_watts variable, which includes Campaigns and Variations that the visitor saw. These custom dimensions can now be sent along with other events and pageviews.
Validating the Integration
There are two steps you can take to validate that the integration is set up correctly and that SiteSpect is actually sending data to Google Analytics:
- Validate that SiteSpect is injecting the correct code.
- Verify that SiteSpect is successfully sending data to Google Analytics.
To validate that SiteSpect is injecting the correct code onto the page:
- While still on the Global Variation page, open the Preview Settings area and select any Campaign from the As if Assigned To drop-down.
- Click Preview at the bottom of the page. This launches a new tab with changes applied to the page.
- View the source code to ensure that the code is injected onto the page. You will see actual SiteSpect Campaign IDs and Variation Group IDs filled in the ss_watts variable.
It can take up to 24 hours to populate data in Google Analytics, but the custom dimension is set immediately. You can confirm that the custom dimension is set correctly with the Google Analytics’ debugger tool. This debugger tool shows the Custom Dimension with SiteSpect data in the browser's JavaScript Console.
Setting up Google Analytics Dashboards With SiteSpect Data
Once you have set up the SiteSpect Dimension, you can create Google Analytics Dashboards that correlate data you are already collecting (conversion rate, AOV, and so on) with your SiteSpect Campaigns and Variations.
For example, suppose you’re running an A/B Campaign in SiteSpect to test the effect of two new page layouts on your Conversion Rate.
You may want to build a dashboard in Google Analytics that shows a timeline of the Variations against your Conversion Rate. You may also want to see where visitors assigned to this Campaign are located.
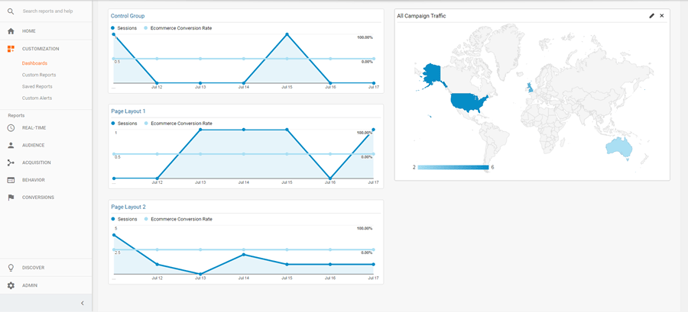
Building the Dashboard
To build the dashboard shown in the image above:
-
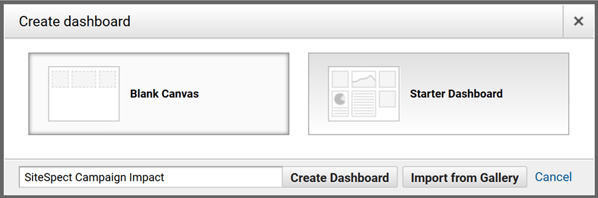
Create a new Blank Canvas Dashboard. Select Customization, Dashboards, and then Create. Give the Dashboard a name and click Create Dashboard.
-
In the Standard area, click the Timeline button to create Timeline Widget for the Control Group.

-
Select Sessions as the metric to graph and Ecommerce Conversion Rate to compare it with. Filter the data to Only show a SiteSpect object Containing the ID number of the Control Group. You can get the ID by looking at your Variations in Summary View (see the image of the Variations above).

-
Add two additional Timeline Widgets for the two SiteSpect Variation Groups.
-
Then add a Geo Widget with a Country metric that plots Sessions against the SiteSpect Dimension filtered by the Campaign ID. With that, your dashboard is complete. You can use the same method to build any visualizations that make sense for any SiteSpect Campaigns you’re running.
Set up Google Tag Manager
If you have implemented the Google Analytics Integration using Google Tag Manager (GTM), you can pass SiteSpect data to Google by modifying the data layer on the page. A data layer is a JavaScript object that contains all of the information that you want to pass to GTM. It must be defined before the GTM tag. To accomplish this, change the WATTS Site Variation Search & Replace area to look for </head> and push SiteSpect data into the data layer using the Replacement Text field as shown in the following image.
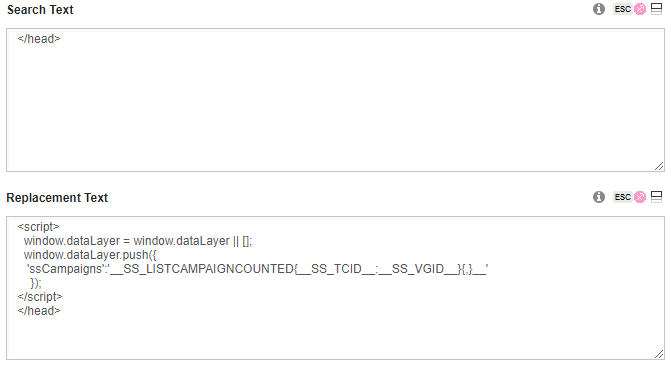
You can select, copy and paste this replacement text in the following block:
<script>
  window.dataLayer = window.dataLayer || [];
  window.dataLayer.push({
    'ssCampaigns':'__SS_LISTCAMPAIGNCOUNTED{__SS_TCID__:__SS_VGID__}{,}__'
    });
</script>
</head>
Additional Capabilities
Integrating More SiteSpect Data
The default SiteSpect integration puts that SiteSpect Campaign ID and Variation ID into a single dimension. In addition, SiteSpect provides macros that you can use to send different data to the SiteSpect Dimension or other Custom Dimensions you create. There are approximately 40 different macros available that allow you to send information about any Metrics (customer behavior) you’re tracking with SiteSpect, page performance, visits, and more.
Need More? Use Our Services Team
Our integration with Google Analytics is extremely flexible; if you have particular objectives that aren’t met by this configuration, our professional services team is available to help. Integration with an Analytics platform is included as part of your SiteSpect on-boarding, so be sure to speak to your SiteSpect Professional Services team to help you design and implement the right integration for your team.