SiteSpect's EventTrack library allows you to use JavaScript to track visitor behavior. Using EventTrack, you can track visitor actions such as clicks and page transitions, as well as basic functionality such as cookie handling, page timers, and W3C DOM events that you can use to build even more advanced tracking techniques. You can implement all of the tracking techniques described below entirely within SiteSpect, without having to insert any JavaScript into your website.
All EventTrack requests are asynchronous by default, which means that they are non-blocking HTTP requests. However, you may want to use EventTrack as a synchronous method when you want a request to finish before continuing. For example, if you want to track when a visitor leaves a site, you would want to use a synchronous request because an asynchronous request will not finish; the visitor will leave the site; and the request will be aborted. If you use a synchronous request, the browser is forced to finish the request before doing anything else.
Note: Please be aware that using a synchronous EventTrack can impact page performance since the browser is forced to finish the request before doing anything else. That means that if you were to use multiple synchronous EventTracks, the delay could be more noticeable.
Getting Started with EventTrack
This section includes an overview of each step required to set up EventTrack along with basic examples that you can customize to meet your advanced tracking requirements. The three main steps are:
Firing SS.EventTrack Events
SS.EventTrack is the JavaScript function call that triggers Metrics that use EventTrack. SS.EventTrack triggers a Metric for your site based upon an Event Name that is specified when calling the function. You can configure the function to be called for any visitor interaction with your website.
The following are typical use cases:
- Tracking visitors who click a link that leaves your domain
- Tracking visitors who click a button on a form
- Tracking mouse-over events such as rollover navigation menus
For assistance configuring EventTrack events to meet your specific tracking requirements, contact the Help Desk at helpdesk@sitespect.com or +1-844-859-1900.
The Metric activating function is SS.EventTrack.rp. It takes up to two parameters: the first (required) is the name of the event being fired; the second (optional) is a numeric value to be summed or averaged for the Metric on reports.
SS.Require(function(){
    SS.EventTrack.rp("my_event",numericalValue);
});
Configuring SS.EventTrack Events Using Tag Attributes
The original JavaScript event model used special attributes in HTML tags on your page. It is from this foundation that the terms "onClick", "onMouseOver", and the other "on" event names are derived. This method is the most cross-browser compatible and typically the easiest to configure. In many cases, if the tag already has an “on” event defined, you can append the SS.EventTrack.rp method to the event. However, it may be difficult to configure if there are existing event functions already defined using this method. Contact the Help Desk at helpdesk@sitespect.com or +1-844-859-1900 if you need assistance configuring your events.
To use this method, add the appropriate "on" event attribute name to the tag of the component that the visitor will interact with if the Metric is triggered. The value of the attribute is the function name with the function parameters to call it with.
Example 1: Off-Site Click
<a href="https://www.example.com/"" onclick="SS.Require(function(){SS.EventTrack.rpSync('offsite_click');});">Text</a>
Configure SS.EventTrack Triggers to Run on Page View
If the page you are attempting to track is not on a SiteSpect-tested site or requires some calculations before triggering, you can call the function on page view by inserting another script tag into the bottom of the page.
Example 2: Order Subtotal Value Capture
SS.Require(function(){
    var orderSubtotal = 299.99;
    SS.EventTrack.rp("purchase",orderSubtotal);
});
Configure SS.EventTrack Triggers using DOM Events
Certain JavaScript-enabled sections of your site may not be compatible with the "on" event model. If that is the case, you can use the SS.JSEvents utility to configure the SS.EventTrack function. One example of this is a JavaScript-enabled rollover menu. By using the more advanced W3C DOM Events model, you can avoid conflicts with existing JavaScript.
Example 3: Advanced Navigation Menu Rollover Tracking
<ul id="nav-menu" onmouseover="rolloverMenu();"
    <li>Home</li>
    <li>Products</li>
    ...
</ul>
var navMenu = document.getelementById("nav-menu");
SS.Require(function(){
   SS.JSEvents.on(el, "mouseover", function(){
      SS.EventTrack.rp("nav-rollover");
   });
});
Example 4: Regular Navigation Menu Rollover Tracking
<ul id="nav-menu" onmouseover="rolloverMenu();SS.Require(function(){SS.EventTrack.rp("nav-rollover");});">
    <li>Home</li>
    <li>Products</li>
    ...
</ul>
Setting up SS.EventTrack Metrics
You must create a Metric for each behavior or action that you want to track. EventTrack Metrics use the same group of Triggers; change the event name (see Parameter Value below) for each specific event. The red text in the Triggers below indicates the text that you should customize.
When creating an EventTrack metric in the new SuperFresh interface, select the Custom event listener (advanced) method. When using this option, you only need to specify your event name, and SiteSpect will construct the remaining triggers automatically.
Basic Triggers for EventTrack
Use the following Triggers for the EventTrack Metric:
- URL: ^/__ssobj/track
- Parameter Name: ^event$
- Parameter Value: ^my_event$ (This is my_event used in the SS.EventTrack function call; see Setting up SS.EventTrack Events.)
![]()
Triggers for Value Capture using EventTrack
Use the following Triggers for the EventTrack Metric:
- URL: ^/__ssobj/track
- Parameter Name: ^event$
- Parameter Value: ^my_event$ (This is my_event used in the SS.EventTrack function call; see Setting up SS.EventTrack Events.)
![]()
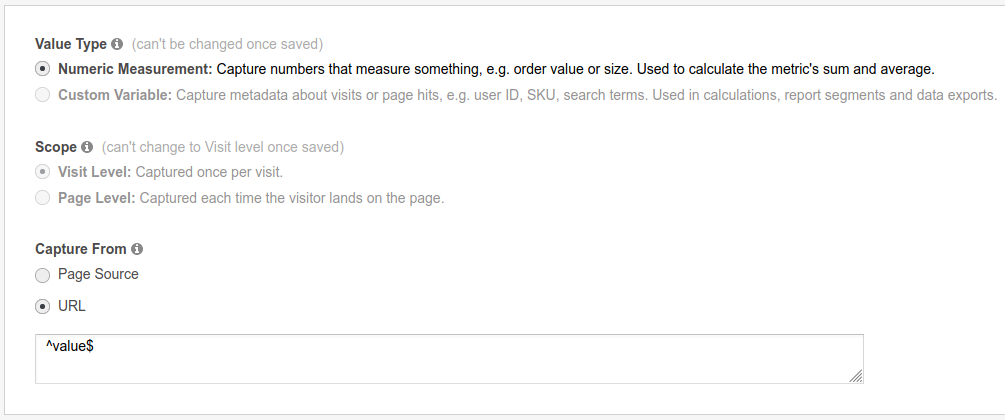
In the Capture a Custom Value section of the Metric:
- Set Value Type to Numeric Value.
- Set Capture From to URL.
- Enter ^value$ in the text field.
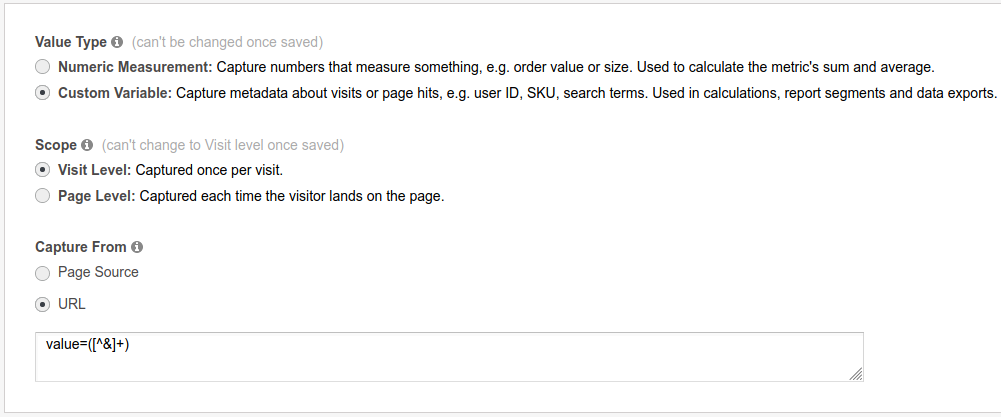
When capturing a Custom Variable (e.g. string), the syntax for step 3 is: value=([^&]+)
SS.PageTimer - Measuring Page Performance Using Timers
SS Core JavaScript includes the ability to track several common performance measurements. The SS.PageTimer calls SS.EventTrack when certain events are fired and reports back the time in seconds since the page was first requested.
Note: Be sure to configure the Metrics for these events including the Value Capture tracking. All SS.PageTimers use the same SS.EventTrack style Metrics.
1: The Ready Timer
The page ready time is the time it takes for the browser to receive all of the HTML from the web server and finish interpreting it. However, additional resources such as CSS, JS, and images may not be completely downloaded yet. This is the time it takes for the visitor to receive the HTML. This timer uses the DOMContentLoaded JS Event.
SS.Require(function(){
    SS.PageTimer.time('ready', 'Event Name');
});
SiteSpect recommends using the event name 'pgready'.
2: The Load Timer
The page load time is the time it takes for the browser to completely finish downloading the page and all resources and to render that page for the visitor. This is the time until the browser's spinner stops moving. This timer uses the window.onLoad JS Event.
SS.Require(function(){
    SS.PageTimer.time('load', 'Event Name');
});
SiteSpect recommends using the event name 'pgload'.
3: The Dwell Timer
The page dwell time is the time that the visitor spends with that page loaded in the browser. This event uses the window.onUnload JS Event.
SS.Require(function(){
    SS.PageTimer.time('dwell', 'Event Name');
});
SiteSpect recommends using the event name 'pgdwell'.
4: The Abandon Timer
The abandon timer tracks how many visitors are leaving the page before the page finishes loading and how long they waited. This event fires only if the window.onUnload JS Event triggers before the window.onLoad JS Event.
SS.Require(function(){
    SS.PageTimer.time('abandon', 'Event Name');
});
SiteSpect recommends using the event name 'pgabandon'.
The SS.PageTimer begins tracking time as soon as it is invoked. Placing the timer as early in the page as possible ensures that the complete time is tracked. For more accurate tracking with a minimum impact on performance, initialize the timer at the very beginning of the HTML head tag, but then wait until the end of the HTML head (or even later) to configure the actual timers. A timer added at the beginning of the HTML head can be passed as the third parameter to the SS.PageTimer.time function call and it will be used as the start time.
<head>
    <script>window.__ss_load_start=new Date();</script>
    ...
    SS.Require(function(){
        SS.PageTimer.time('TIMER_TYPE', 'EVENT_NAME', window.__ss_load_start);
    });
</head>
In general, you learn very little by having a single Metric track the load time for every page on a site. Different pages may have very different lengths of time for loading (small simple pages compared with large complicated pages) and averaging these values does not typically give much insight. We recommend configuring Metrics for specific pages so that you can compare the same page's load time against the control and detect any significant changes.
One way to track the timer on every page of the site and to differentiate them is to add the page's URL path or HTML title as the suffix to EVENT_NAME:
SS.Require(function(){
    SS.PageTimer.time('TIMER_TYPE', 'EVENT_NAME' + window.location.pathname);
});
Or:
SS.Require(function(){
    SS.PageTimer.time('TIMER_TYPE', 'EVENT_NAME' + window.document.title);
});
Debugging EventTrack
This debugging example uses the Metric pictured in the following image to show you how to test your EventTrack settings.
![]()
To test this EventTrack Metric, you're going to examine the SiteSpect Info Header Codes. To view the HTTP headers for a specific request, you will need to use an HTTP monitoring tool such as the Developer tools available in Chrome or FireFox when you press F12. You can also run a developer's plug-in such as foxmeter or a stand-alone application such as Fiddler or Charles Web Debugging Proxy. To examine the header codes:
- Preview the Metric.
- Launch your HTTP monitoring tool as described above.
- Reproduce the website behavior you want to capture.
- Using the HTTP monitoring tool, look for the request to /__ssobj/track.
- Confirm that the event parameter is equal to the Parameter Value from your Metric. In the case of the Metric in the image above, it would look like this: event=my_event.
- Locate the Response Header called SiteSpect Info.
- Look for the M:1 flag, which confirms that the Metric matched on the EventTrack request.
![]()
If you find that everything appears as described above, you know you've set up your EventTrack Metric correctly.