SiteSpect integrates with many different content management systems to:
- Improve workflow.
- Seamlessly test content created in your CMS.
- Run tests and optimize your site without the assistance of a developer.
These steps describe how to integrate SiteSpect with Drupal and are intended for a user who has some experience with Drupal and who has the correct permissions to implement code changes on your website.
High-Level Integration Steps
Drupal is an open source content management system (CMS) that allows you to build, edit, and publish web pages. Using SiteSpect, you can set up Campaigns to test Variations of content created in your CMS. The following are two different use cases for testing different types of content:
Testing a New Landing Page
To test a new landing page, first create the new landing page in Drupal, then use SiteSpect to set up a SiteSpect URL-Based Origin Experiment Campaign.
Set up a New Landing Page in Drupal
The simplest test you can run on your CMS is to test the effect of a new page. Suppose you want to test a new landing page design. The process is simple: create a new page in Drupal and use a SiteSpect Origin Experiment Campaign to test it.
To set up the new page in Drupal:
-
Create the new page in Drupal.
-
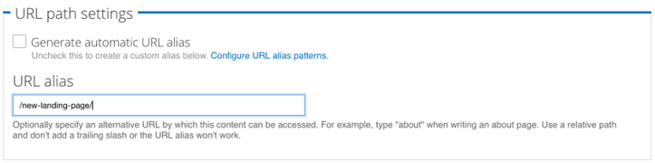
Give the page a new URL.
- Build the new page content.
Set up a SiteSpect URL-Based Origin Experiment Campaign
Use SiteSpect to test the new landing page you created in Drupal as follows:
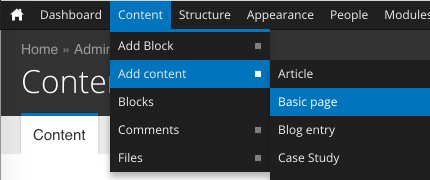
- Select New, A/B Campaign.
- Complete the General section, making sure to select Origin from the Type drop-down.
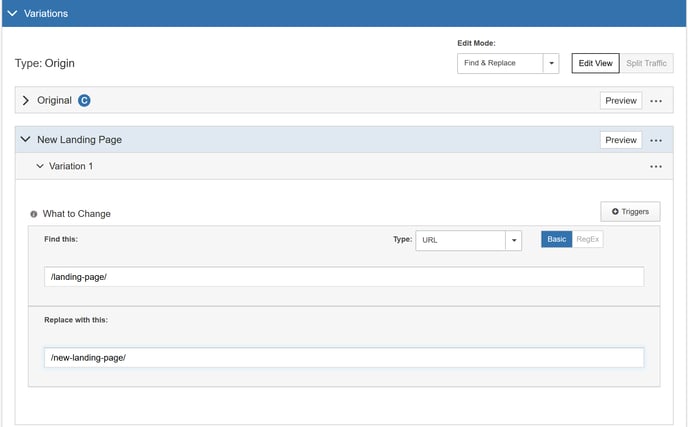
- In the Variations section of the page, rename Variation Group 1 to New Landing Page.
- For Variation 1, select URL from the Type drop-down.
- In the Find This field, enter /landing-page/ (or the name of your landing page).
- In the Replace With This field enter /new-landing-page/ (or the name of your new Drupal landing page).
- Finish by selecting Metrics you want to track and any Audiences you want to target.
- Click Save at the bottom of the page.
When you set this Campaign to Active - Running, SiteSpect divides your traffic between the new and old landing pages: visitors assigned to the control group view the original page, but visitors assigned to the Variation, see the new landing page. While most testing and optimization software use a traditional redirect to perform this test, SiteSpect can actually change the URL on the request, similar to a load balancer; the origin receives a request for the new URL.
Testing New Content on Existing Pages
To modify an existing page by replacing some text, adding a banner, or inserting a new widget, you don’t need to test the full page. Build a page block in Drupal and use SiteSpect to test it.
To do this, you’ll need a couple of new Drupal Modules:
- Context – https://www.drupal.org/project/context
- Context Query Parameters – https://www.drupal.org/project/context_query_param
These modules allow you to show content only when requests to your site are made with specific query parameters.
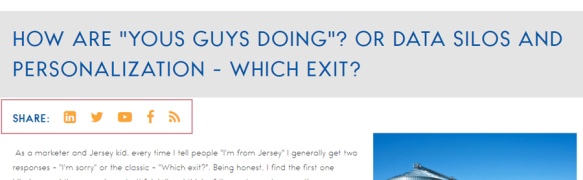
Let’s use the SiteSpect website as an example. You want more readers of the SiteSpect Blog to share our articles and you think a call-to-action to share our articles will improve our exposure. To test this, you’ve built a new block that promotes sharing the blog articles to social media, shown in the red rectangle in the following image.
You’re going to change the following page: http://www.sitespect.com/blogs/how-are-you-guys-doing-or-data-silos-and-personalization-which-exit.
To do this, create a new Block in Drupal and restrict when it will be visible using a Context with a special Query Parameter as follows:
- Create a new Block called Blog Social Media Sharing Block that includes the icons for sharing as shown in the image above.
-
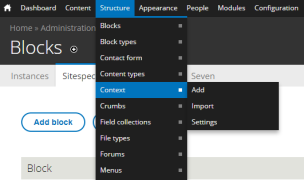
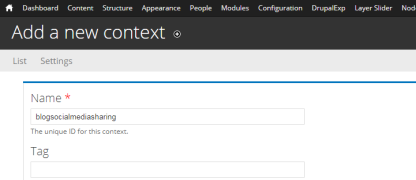
To create a new Context, select Structure, Context, and then Add.
-
Name the context blogsocialmediasharing.
-
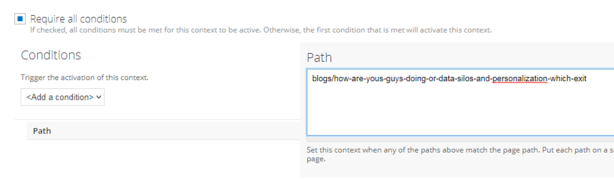
Select the Require All Conditions check box and choose Path from the Condition drop-down to add a Path Condition. Then enter the following path:
blogs/how-are-you-guys-doing-or-data-silos-and personalization-which-exit
-
Add a Query Condition by choosing Query Parameter from the Condition drop-down. Then define a Parameter Name called test, select must equal from the Operator drop-down and then enter enabled for the Parameter Value.

-
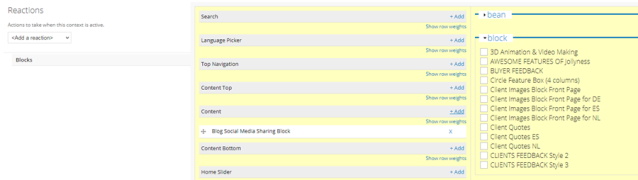
Finally, select Block from the Reactions drop-down and select Blog Social Media Sharing Block from the Block submenu.
- Click Save at the bottom of the page.
- To test the new Context, navigate to the blog post above and append the query ?test=enabled to the URL. When you do, you see the Blog Social Media Sharing Block.
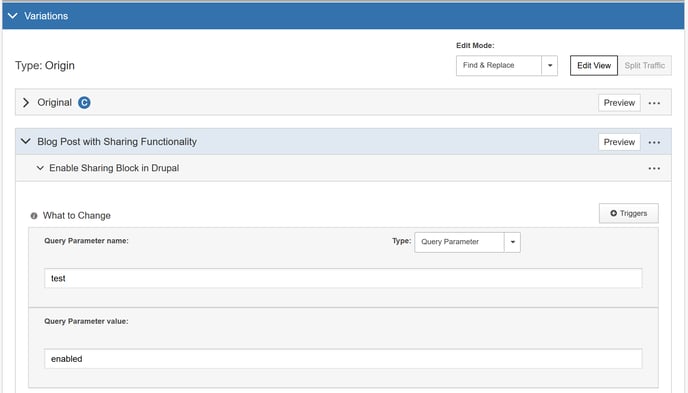
With the change built, set up a SiteSpect Campaign to test the new Block:
- Select New, A/B Campaign.
- Complete the General section of the page.
- In the Variations section of the page, rename Variation Group 1 to Blog Post with Sharing Functionality.
- Rename Variation 1 to Enable Sharing Block in Drupal.
- Select Query Parameter from the Type drop-down.
- In the Find This field, enter test.
- In the Replace With This field enter enabled.
- Finish by selecting Metrics you want to track and any Audiences you want to target.
- Click Save at the bottom of the page.
When you set this Campaign to Active - Running, SiteSpect divides traffic between blog posts with the block enabled and disabled.